Initial Thoughts on Affinity by Canva

I’ve been an Affinity Photo/Designer/Publisher user since sometime before 2019 (the first mention I can find here), and have recommended them to a lot of people as a less expensive but (nearly) equivalent alternative to Adobe’s Photoshop/Illustrator/InDesign suite of apps. Last year Affinity was acquired by Canva, which did not thrill me (I’m not a fan of Canva, as accessibility has never seemed to be a high priority for them, and remediating PDFs created by Canva users is an ongoing exercise in frustration), but at the time they pledged to uphold Affinity’s pricing and quality. All we could do at that point was wait to see what happened.

A few weeks ago, Affinity closed their forums, opened a Discord server, removed the ability to purchase the current versions of the Affinity suite of apps, and started posting vague “something big is coming” posts to their social media channels and email lists. Not surprisingly, this did not go over well with much of the existing user base, and we’ve had three weeks of FUD (fear, uncertainty, and doubt), with a lot of people (including me) expecting that Canva would taking Affinity down the road of enshittification.

Yesterday was the big announcement, and…
The Affinity by Canva startup splash screen.

…as it turns out, it looks to me at first blush that it doesn’t suck. The short version:

  1. Affinity Photo, Designer, and Publisher have been deprecated, all replaced with a single unified application called Affinity by Canva.
    1. The existing versions of the old Affinity suite (version 2.6.5) will continue to work, so existing users can continue to use those if they don’t want to update. In theory, these will work indefinitely; in practice, that depends on how long Canva keeps the registration servers active and when Apple releases a macOS update that breaks the apps in some way. Hopefully, neither of those things happens for quite some time (and if Canva ever does decide to retire the registration servers, I’d really hope that they’d at least be kind enough to issue a final update for the apps that removes the registration check; I don’t expect it, but it would be the best possible way to formally “end of life” support for these apps).
  2. Affinity by Canva is free.
    1. You do need to sign in with a Canva account. But you had to sign in to Affinity with Serif account, and Canva now owns Serif, so this isn’t exactly a big surprise for me.
  3. The upsell is that if you want to use AI features, you have to pony up for a paid Canva Pro account. Assumedly, they figure there are enough people on the AI bandwagon that this, in combination with Canva’s coffers, will be enough to subsidize the app for all the people who don’t want or need the AI features.
    1. “AI features” is a little vague, but it seems to cover both generative AI and machine learning tools.

    2. Affinity’s new “Machine Learning Models” preferences section has four optional installs: Segmentation (“allows Photo to create precise, detailed pixel selections”), Depth Estimation (“allows Photo to build a depth map from pixel layers or placed images”), Colorization (“used to restore realistic colors from a black and white pixel layer”), and Super Resolution (“allows pixel layers to be scaled up in size without loss of quality”). Of these, Segmentation is the only one that currently is installable without a Canva Pro account; the other three options are locked. The preferences dialog does have a note that “all machine learning operations in Affinity Photo are performed ‘on-device’ — so no data leaves your device at any time”.

    3. The Canva AI Integrations page on the new Affinity site indicates that available AI tools also include generative features such as automatically expanding the edges of an image and text-to-image generation (interestingly, this includes both pixel and vector objects).

    4. In the FAQs at the bottom of the integrations promo page, Canva says that Affinity content is not used to train AI. “In Affinity, your content is stored locally on your device and we don’t have access to it. If you choose to upload or export content to Canva, you remain in control of whether it can be used to train AI features — you can review and update your privacy preferences any time in your Canva settings.”

      1. If you, like me, are not a fan of generative AI, I do recommend checking your Canva account settings and disabling everything you can (I’ve done this myself). The relevant settings are under “Personal Privacy” (I disabled everything) and “AI Personalization”.
    5. I actually feel like this is an acceptable approach. Since I’m no fan of generative AI, I can simply not sign up for a Canva Pro account, disable the “Canva AI” button in Affinity’s top button bar, and not worry about it; people who do want to use it can pay the money to do so. I do wish there was a clearer distinction between generative AI and on-device machine learning tools and that more of the on-device machine learning tools were available without being locked behind the paywall; that said, the one paywalled feature I’d be most likely to occasionally want to use is the Super Resolution upscaling, and I can do that in an external app on the occasional instances where I need it.

So at this point, I’m feeling mostly okay with the changes. There are still some reservations, of course.

I’m not entirely sold on the “single app” approach. Generally, a “one stop shop” approach tends to mean that a program is okay at doing a lot of things instead of being really good at doing one thing, and it would be a shame if this change meant reduced functionality. That said, Affinity has said that this was their original vision, and they’ve long had an early version of this in their existing apps, with top-bar buttons in each app that would switch you into an embedded “light” version of the other apps for specific tasks, so it does feel like a pretty natural evolution.

A lot of this does depend on how much trust you put in Canva. Of course, that goes with any customer/app/developer relationship. I have my skepticism, but I’m also going to recognize that at least right now, Canva does seem to be holding to the promises that they made when they acquired Serif/Affinity.

Time will tell how well Canva actually holds to their promises of continuing to provide a free illustration, design, and publishing app that’s powerful enough to compete with three of Adobe’s major apps. Right now, I’m landing…maybe not on “cautiously optimistic”, but at least somewhere in “cautiously hopeful”.

Finally, one very promising thing I’ve already found. While I haven’t done any in-depth experimenting yet, I did take a peek at the new Typography section, and styles can now define PDF export tags! The selection of available tags to choose from is currently somewhat limited (just P and H1 through H6), but the option is there. I created a quick sample document, chose the Export: PDF (digital – high quality) option, and there is a “Tagged” option that is enabled by default for this export setting (it’s also enabled by default for the PDF (digital – small size) and PDF (for export) options; the PDF (for print), PDF (press ready), PDF (flatten), PDF/X-1a:2003, PDF/X-3:2003, and PDF/X-4 options all default to having the “Tagged” option disabled).

When I exported the PDF (38 KB PDF) and checked it in Acrobat, the good news is that the heading and paragraph tags exist! The less-good news is that paragraphs that go over multiple lines are tagged with one P tag per line, instead of one P tag per paragraph.

So accessible output support is a bit of a mixed bag right now (only a few tags available, imperfect tagging on export), but it’s at least a good improvement over the prior versions. Here’s the current help page on creating accessible PDFs, and hopefully this is a promising sign of more to come.

Google Docs Adds PDF Accessibility Tagging

I don’t know exactly when this happened (my best guess is maybe sometime in April, based on this YouTube video; if you watch it, be aware that the output seems to have improved since it was made), but at some point in the not-too-distant past, Google Docs has started including accessibility tags in downloaded PDFs. And while not perfect, they don’t suck!

update: Looks like this started rolling out in December 2024, earlier than I realized. Thanks to Curtis Wilcox for pointing out the announcement link.

Quick Background

For PDFs to be compatible with assistive technology and readable by people with various disabilities, including but not at all limited to visually disabled people who use screen readers like VoiceOver, JAWS, NVDA, and ORCA, PDFs must include accessibility tags. These are not visible to most users, but are embedded in the “behind the scenes” document information, and define the various parts of the document. Assistive technology, rather than having to try to interpret the visual presentation of a PDF, is able to read the accessibility tags and use those to voice the document, assist with navigation, and other features.

However, until recently, Google Docs has not included this information when exporting a PDF using the File > Download > PDF Document (.pdf) option. PDFs downloaded from Google Docs, even if designed with accessibility features such as headings, alt text on images, and so on, were exported in an inaccessible format (as if they had been created with a “print to PDF” function). The only way around this was to either use other software to tag the PDF or to export the document as a Microsoft Word .docx file and export to PDF from Word.

But that’s no longer the case! I first realized this a couple months ago when I was sent a PDF generated from Google Docs and was surprised to see tags already there. I’ve recently had the chance to dig into this a little bit more, and I’m rather pleasantly surprised by what I’m seeing. It’s not perfect, but it doesn’t suck.

Important note

I’m not a PDF expert! I’ve been working in the digital accessibility space for a bit over three years now, but I’m learning more stuff all the time, and I’m sure there’s still a lot I don’t know. There are likely other people in this space who could dig into this a lot more comprehensively than I can, and I invite them to do so (heck, that’s part of why I’m making this post). But I’m also not a total neophyte, and given how little information on this change I could find out there, I figured I’d put what knowledge I do have to some use.

Testing process

Very simple, quick-and-dirty: I created a test Google Doc from scratch, making sure to include the basics (headings, descriptive links, images with alt text) and some more advanced bits (horizontal rules, a table, a multi-column section, an equation, a drawing, and a chart). I then downloaded that document as a PDF and dug into the accessibility tags to see what I found. As I reviewed the tags, I updated the document with my findings, and downloaded a new version of the PDF with my findings included (338 KB .pdf).

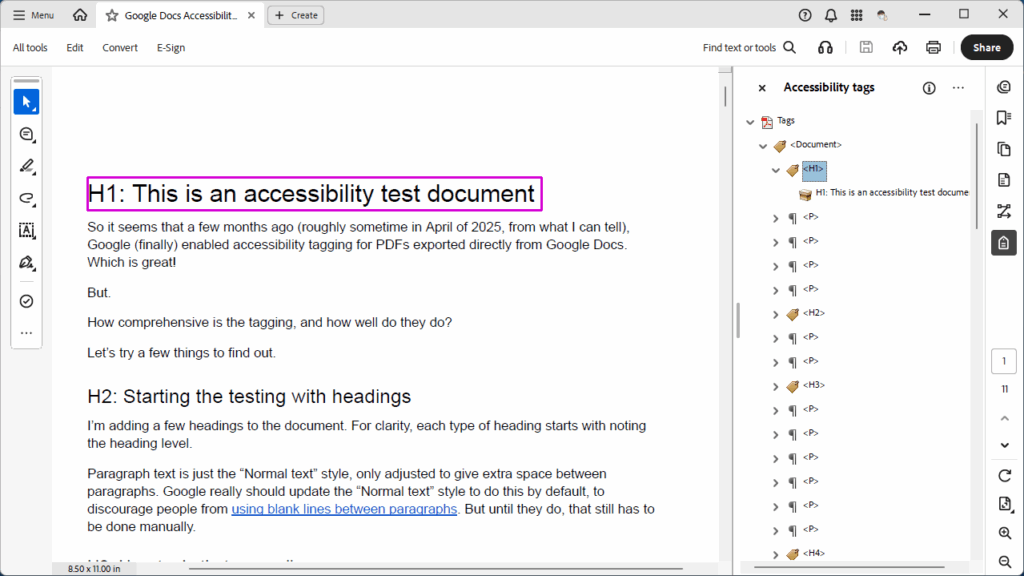
Acrobat Pro displaying a document titled 'this is an accessibility test document' with the tags pane open to the right and the first line of the document selected and highlighted with a purple box.

Findings

More details are in the PDF, but in brief:

  • Paragraphs are tagged correctly as <P>.
  • Heading are tagged correctly as <H1> (or whatever level is appropriate).
  • Links are tagged correctly as a <Link> with a <Link - OBJR> tag. Link text is wrapped in a <Span>, and the link underline ends up as a non-artifacted <Path>.
  • Images are tagged correctly as a <Figure> with alt text included. However, images on their own lines end up wrapped inside a <P> tag and are followed by a <Span> containing an empty object (likely the carriage return).
  • Lists are pretty good. If a <LI> list item includes a subsidiary list, that list is outside of the <LBody> tag, and I’m not sure if that’s correct, incorrect, or indifferent. Additionally, list markers such as bullets or ordinals are not wrapped in <LBL> tags but are included as part of the <LBody> text object. However, this isn’t unusual (I believe Microsoft Word also does this), and doesn’t seem to cause difficulties.
  • Tables are mostly correct, including tagging the header row cells with <TH> if the header row is pinned (which is the only way I could find to define a header row within Google Docs). However, the column scope is not defined (row scope is moot, as there doesn’t seem to be a way to define row header cells within Google Docs; the table options are fairly limited).
  • Horizontal lines are properly artifacted, but do produce a <P> containing an empty object (presumably the carriage return, just as with images).
  • Using columns didn’t affect the proper paragraph tagging; columned content will be read in the proper order.
  • Inserted drawings and charts are output as images, including any defined alt text.
  • Equations are just output as plain text, without using MathML, and may drop characters or have some symbols rendered as “Path” within the text string. STEM documents will continue to have issues.

Conclusion

So, not perfect…but an impressive change from just a few months ago, and really, the output doesn’t suck! For your basic, everyday document, if you need to distribute it as a PDF instead of some other more accessible native format, PDFs downloaded from Google Does now seem to be a not-horrible option. (My base recommendation is still to distribute native documents whenever possible, as they give the user agency over the presentation, such as being able to adjust font face, size, and color based on their needs. However, since PDFs are so ubiquitous, it’s heartening to see Google improving things.)

ABBYY FineReader Amazement and Disappointment

I’ve spent much of the past three days giving myself a crash-course in ABBYY FineReader on my (Windows) work laptop, and have been really impressed with its speed, accuracy, and ability to greatly streamline the process of making scanned PDFs searchable and accessible. After testing with the demo,I ended up getting approval to purchase a license for work, and I’m looking forward to giving it a lot of use – oddly, this seemingly tedious work of processing PDFs of scanned academic articles to produce good quality PDF/UA accessible PDFs (or Word docs, or other formats) is the kind of task that my geeky self really gets into.

Since I’m also working a lot with PDFs of old scanned documents for the Norwescon historical archives project, tonight after getting home I downloaded the trial of the Mac version, fully intending to buy a copy for myself.

I’m glad I tried the trial before buying.

It’s a much nicer UI on the Mac than on Windows (no surprise there), and what it does, it does well. Unfortunately, it does quite a bit less — most notably, it’s missing the part of the Windows version that I’ve spent the most time in: the OCR Editor.

On Windows, after doing an OCR scan, you can go through all the recognized text, correct any OCR errors, adjust the formatting of the OCR’d text, even to the point of using styles to designate headers so that the final output has the proper tagging for accessible navigation. (Yes, it still takes a little work in Acrobat to really fine-tune things, but ABBYY makes the entire process much easier, faster, and far more accurate than Acrobat’s rather sad excuse for OCR processing.)

On the Mac, while you can do a lot to set up what gets OCRd (designating areas to process or ignore, marking areas as text or graphic, etc.), there’s no way to check the results or do any other post-processing. All you can do is export the file. And while ABBYY’s OCR processing is extremely impressive, it’s still not perfect, especially (as is expected) with older documents with lower quality scan images. The missing OCR Editor capability is a major bummer, and I’m much less likely to be tossing them any of my own money after all.

And most distressingly, this missing feature was called out in a review of the software by PC Magazine…nearly 10 years ago, when ABBYY first released a Mac version of the FineReader software. If it’s been 10 years and this major feature still isn’t there? My guess — though I’d love to be proven wrong — is that it’s simply not going to happen.

Pity, that.