Back (Sorta)

While I don’t really think that very many people noticed, something went all pear-shaped over the weekend and this blog disappeared for a few days. Thanks to some assistance from Dreamhost support, I’m back up and running…mostly. Some of the plugins I used broke, and I’ve lost the customizing of the theme (including all the egolicious representations of me), so I’ll have (yet another) PROJECT to keep me busy once the quarter ends.

So, some minor frustrations. However, the content is here, and that’s the most important part. I was thinking that it was about time for a redesign anyway.

Twitter’s Weird Email Search: Not Findable, Except That They Are

While killing time the other day, I ran into a weird little “feature” on Twitter that, I have to admit, I don’t entirely understand.

Twitter's FInd Friends
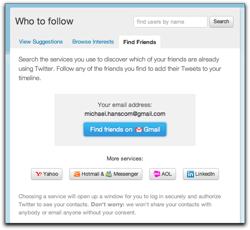
As part of their new interface, there’s a tab at the top titled “Who to Follow”, when then has a tab called “Find Friends” that allows you to hook into your Gmail (or Yahoo, MSN/Hotmail, AOL, or LinkedIn) address book to discover people that you might not know are already on Twitter. So far, so good.

So, I pop my email address in, authorize with Gmail, and let Twitter think for a moment. After a moment of thinking, I get a long list of Twitter accounts that are associated with the email addresses in my address book (most of which I was already following). Once again, so far so good — this is all what I would expect to have happen.

But as I scrolled down, things got a little more odd. I started getting hits for a bunch of people with the cryptic message, “This person is on Twitter, but isn’t yet findable by email. Let them know you’d like to follow them.” When I clicked the “Follow” button on a few of those entries, Twitter kindly let me know that it had sent a message to let them know I was interested in following them.

Not Findable?

This morning, I got a note from one of the people behind those accounts letting me know that that account was unused. They were kind enough to forward the message that Twitter sends, however:

On Jan 28, 2011 11:13 PM, “Twitter” discover-wrejneera=tznvy.pbz-5591e@postmaster.twitter.com wrote:

Michael Hanscom (@djwudi) would like to follow your tweets (@—–) on Twitter.

Michael Hanscom knows your email address: @—–@—–.com. But Twitter can’t suggest you to users like Michael Hanscom because your account (@—–) isn’t configured to let users find you if they know your email address.

So here’s what I don’t understand. These accounts are set to hide their email address, and to not be searchable by email address. This is even mentioned twice, once in the listing after Twitter read through my address book, and again in the email sent out after I hit the “Follow” button. However, that’s exactly how I found the accounts: by their email address.

Sure, Twitter isn’t showing me the account name, so I can’t follow directly. Instead, I have to send a request, and the account owner then has to approve (or disapprove) the request. It does, however, let me know that there is a Twitter account associated with that email address…which seems to run counter to the intent of the account owners who have set their accounts to not be findable by email address.

Is this a bug? A feature? A privacy concern? Or is there something that I’m just not grokking, and this actually makes perfect sense and is how things should work?

Anybody want to toss their two cents in the ring (yes, mixed metaphor, I know)?

Court Briefing/Pleading Template for Apple Pages (iWork)

Here’s another Apple Pages template I created for my school work, this time for my Legal Writing class. This is a court briefing (or pleading) template, based (more or less) on the court standards for Washington State.

It must be stressed that I in no way guarantee that this template exactly satisfies the requirements of the court system of Washington or any other state, or the requirements of any class you might be taking. I have merely formatted it as best as I can, given the information I have available and my instructor’s requirements. I believe it should be fairly close, however, and it should be adaptable to full compliance for other jurisdictions with a minimum of work. I think.

Thanks to the excellent Typography for Lawyers website, which is an excellent resource not just for lawyers, but for anyone interested in improving the presentation of their work.

Feel free to download and use the template (198k .template file). Just download and (for easiest use) place in your ~LibraryApplication SupportPagesTemplatesMy Templates folder.

(I didn’t bother translating this to Microsoft Word format, as there are a number of similar templates for Word bundled with Word or already floating around the web, including some on Microsoft’s own website. Unfortunately, Apple doesn’t include any legal templates with Pages, and I didn’t find many during my searches…so here we are.)

##Version History##

  • 2010.11.10: First upload.

RockMelt

From First Look at RockMelt, a Browser Built For Facebook Freaks | Webmonkey | Wired.com:

We’ve seen browsers custom-built for the social web before, most notably Flock, which launched as a MySpaced-up version of Firefox. Mozilla experimented with Ubiquity, an in-browser tool for posting to different social sites and interacting with web services. There are a number of add-ons that can embed social networking dashboards into the browser for you. These tools have grown in popularity as we’ve struggled to manage the ever-increasing flow of links, media and bits shared by our online friends.

So, the idea isn’t original. And RockMelt doesn’t sport a complete re-invention of the browser interface, either. But it is very streamlined, and there are some key elements that people who live and breathe the social web will find intriguing.

(via Wired)

Interesting. I’ve signed up to get a look at it, since I’m pretty constantly on both Facebook and Twitter. I’m not entirely sure how often I’ll use it (do I really need a specialized social media browser?), but I’m at least interested in the idea.

HTML5 Audio Safari Extension

From HTML5 Audio Safari Extension // ShaunInman.com:

HTML5 Audio Safari extension currently replaces the default Tumblr audio player (with or without Flash) and WordPress Audio Player (without Flash).

Comes in very handy when combined with John Gruber’s suggestions for running your Mac Flash-free.


(Also, and somewhat unrelated: I’ve finally gotten tired of the many errors the Delicious-to-weblog plugin was throwing, so I’m going to experiment with moving away from using Delicious as a link aggregator, and just post when I find something interesting. Old-school blogging. Imagine that!)

APA 6th Edition Paper Template for Apple Pages (iWork)

As I’ve been writing papers for my class assignments, I’ve been working on fine-tuning an APA 6th Edition template for Apple’s Pages. I based my template on a Microsoft Word template provided by Dr. Paul Rose of Southern Illinois University Edwardsville.

For Pages ’09 (v.4.0–4.3)

Feel free to download and use the template (314k .template file) for your own papers. Just download, decompress, and then (for easiest use), place in your ~Library/Application Support/iWork/Pages/Templates/My Templates folder.

For Pages ’13 (v.5.0+)

An initial cursory check seems to indicate that the template works just fine under Pages 5.0, so feel free to download and use the same template file. If anyone does note any problems with the template under Pages 5, please leave a comment here and I’ll look into making corrections.

The easiest way to add the template to Pages 5, according to Apple, is to open the template file, then click Add to Template Chooser.

For the more technically-inclined, Apple has changed where template files are stored. If you want to dig down to add or remove them manually, the new location is ~Library/Containers/com.apple.iWork.Pages/Data/Library/Application Support/User Templates. Note that com.apple.iWork.Pages is a package, not a directory; to continue along the path you’ll need to right-click on the package and choose the “Show Package Contents” item.

For Microsoft Word

I’ve also created versions of the template file for Microsoft Word in both .dotx (for Word 2007 or later) and .dot (for earlier versions of Word). Feel free to download both in one .zip file (35k .zip file) or individually (.dotx for Word 2007+ (36k) or .dot for Word 2003 (55k)).

For easiest use: On a PC, place the templates in your C:\Documents and Settings\(user name)\Application Data\Microsoft\Templates folder; on a Mac, place the templates in your ~/Library/Application Support/Microsoft/Office/User Templates/My Templates folder.

Version History

  • 2010.10.28: First upload.
  • 2010.10.29: Corrected double-spacing of reference page, added appendix, table, and figure pages. Added Word versions.
  • 2010.11.9: Corrected third-, fourth-, and fifth-level headings to use standard sentence capitalization and to be paragraph-level headings.
  • 2010.11.29: Corrected first-level headings to be truly centered.
  • 2013.10.25: No change to the template; updated blog post to include Pages 5 information.

21st Century Television (Part Two)

As promised, here’s a bit more information on the geeky details of how I’ve set up our cable-free TV system.

First off, credit where credit is due: I got a lot of pointers in setting all of this up from this post at Nyquil.org, along with a couple of follow-up email messages with Jer. Thanks!

  1. Set up a GigaNews Usenet account. While Usenet, in the pre-web days, was one of the premier methods of communicating across the ‘net and thus included free with most Internet packages, those days are long gone. Now, Usenet is the best and fastest way to grab those TV episodes we’re looking for, but it costs a few dollars a month to get access (far less than your average cable bill, however). There are other Usenet providers available, but Giganews was recommended to me, is working fine for me, and is reasonably priced, so I’m passing on the recommendation to you.

  2. Set up a (free) NZBs(dot)ORG account. .nzb files are the Usenet equivalent of Bittorrent’s .torrent files: pointers to all the various pieces of each media file. NZBs(dot)ORG lists NZBs in a number of categories; the TV > XVID category is non-HD if you still have an old non-HDTV; people with HDTVs may want to use the x264 category for 720p/1080p content.

  3. Install SABnzbd+. This is a free, open-source program that handles all the pain-in-the butt steps of using .nzb files. Without SABnzbd+…well, I’ll let Jer explain:

    …you…find yourself manually extracting RAR files, applying PAR2 files to regenerate missing chunks, and then disposing of all the compressed/encoded files after extracting your media file. Not to mention seeking out and downloading every episode of everything you want to download. It’s not for the faint of heart.

    With SABnzbd+, you simply toss it the .nzb file, and it takes care of all of that for you. Even better, it supports a “drop folder” system, so you can simply put a downloaded .nzb file into a folder, and moments later it automagically gets slurped into SABnzbd+ and the files start downloading. Even better than that, though, is its support for RSS feeds…and since NZBs(dot)ORG lets you save RSS feeds of particular searches, it’s relatively trivial to automate the downloading process.

    For my setup, I created an “nzb” folder inside my usual “Downloads” folder. Inside that, I have three folders: “new” (my SABnzbd+ drop folder, for adding manually downloaded .nzb files), “incomplete” (where SABnzbd+ stores the in-progress downloads), and “complete” (where SABnzbd+ stores the finished downloads after post-processing). I also have an alias to the media folder that the Roksbox software accesses; this is for my own convenience and not necessary in all setups.

    SABnzbd+ folder structure

  4. Set up and save searches on NZBs(dot)ORG for the shows you want to track. (NOTE: NZBs(dot)ORG has redesigned since this post was written, so these instructions aren’t quite correct anymore. They should be close enough to point you in the right direction, though.) Click on the “My Searches” link towards the top right of the NZBs(dot)ORG page, then click on “[Add]” next to “Saved Searches” towards the left of the “Add Search” page. Because NZBs(dot)ORG doesn’t allow for a preview of a search, I’ve found it easiest to keep the NZBs(dot)ORG front page open in a separate tab so that I can do a test search for my primary search terms, then look for which terms I want to exclude.

    For example, we want to watch CSI, but aren’t interested in the New York or Miami spinoffs. So, my saved search uses the search term “csi” in the “TV-XviD” category, but filters out anything with “dvdrip” (as I’m not interested in older episodes ripped from DVDs), “ny,” “york,” “miami,” or “geographic” (apparently there’s a National Geographic show that uses the initials CSI in its title).

    Safari002.png

    Eventually, you’ll build up a list of shows that will automatically populate whenever a new show that matches any of your saved searches appears on Usenet. Here’s a look at how my searches are set up — no snarks on our taste in TV, please, we’re quite aware of our guilty pleasures. ;)

    Safari003.png

    Now, see that little “RSS” link after each search? Those are going to come in very handy, as we flip back over to SABnzbd+….

  5. Add your saved searches to SABnzbd+. Under the “Config” link in the left hand sidebar of SABnzbd+, click on “RSS”. Copy the RSS feed link for one of your NZBs(dot)ORG saved searches, paste it into the “RSS Configuration” > “New Feed URL” field in SABnzbd+, name the feed something other than “Feed1”, and hit the “Add” button. That’s it!

    (While SABnzbd+ does offer various filtering options for RSS feeds, because you’re taking care of the filtering ahead of time in your NZBs(dot)ORG searches, you shouldn’t need to worry about these fields. If you’re using a different .nzb search site that doesn’t allow customization of RSS feeds, you should be able to use these filters to remove items you’re not interested in.)

    Safari004.png

    The first time SABnzbd+ scans the RSS feed, it will not download anything — this is intentional, as you probably don’t want to suddenly be downloading all of the items listed in the RSS feed. If there are any recent episodes that you’d like to download, you can click on the “Preview” button next to your newly-entered feed to choose which items you’d like to download.

    Go through and add the rest of the RSS feeds for your saved searches, and you’re all set. From here on out, as long as SABnzbd+ is running, it will keep an eye on your saved searches. Whenever a new episode that matches one of your searches appears, SABnzbd+ will see it in the RSS feed, grab the .nzb file, download everything it needs, assemble and decompress it, and store the finished download in the “completed” folder.

Now, if all you’re interested in is getting ahold of TV episodes and having them on your computer to watch, you’re set! I copy the downloaded files to a network drive and use the Plex software to pipe the shows over to the Roku player attached to our TV. Good to go!


NOTE: The following information is the original ending to this post, but is deprecated, as the situation is now simpler. However, I’m keeping it here for the sake of completeness.

However, in our case, I also need to convert the downloaded video from .avi to H.264-encoded .mov or .mp4 files, as that’s the only format that the Roku player will accept, and then move the files into their proper place within my computer’s webserver for Roksbox to access. While I haven’t been able to automate all of this, I have managed to use Automator, AppleScript, and the HandBrake video conversion software’s command line interface to automate the .avi to .mp4 conversion.

Now, I’m no Automator or AppleScript guru — this is actually one of my first experiments with either technology — so this may not be the best or most efficient way to handle this particular option. I’m certainly open to suggestions for improvement! However, it’s working for me…so far.

If you’d like, you can download my Automator action (121k .zip file). To install it, decompress the .zip file and add it to your ~LibraryWorkflowsApplicationsFolder Actions folder. Create a folder named “TV” inside the ~Downloadsnzbcomplete folder (it will be added automatically by SABnzb+ the first time it downloads a TV episode, but it needs to exist for this to work). Additionally, the HandBrake CLI must be installed in your main Applications directory.

To activate the HandBrake action, right-click on the “TV” folder and choose “Folder Actions Setup…” from the pop-up menu. In the Folder Actions Setup dialog, choose “Handbrake.workflow” and click the “Attach” button. Once that’s done, whenever SABnzbd+ finishes post-processing a download and moves the folder containing all of the files to the “TV” folder, this Automator workflow will automatically be triggered. Here’s what it does:

  1. Get Folder Contents and repeat for each subfolder found. This scans the TV folder and the folder that’s just been added to it to find all the contents.

  2. Filter Finder Items for files with the .avi extension that are larger than 20 MB (this avoids running into a conflict with the small quality sample .avi files that are sometimes included).

  3. Run AppleScript

    on run {input, parameters}
      set input to POSIX path of input
      set ConvertMovieCmd to "nice /Applications/HandBrakeCLI -i " & input & " -o " & input & ".mp4 --preset="Normal" ;"
      do shell script ConvertMovieCmd
      return input & ".mp4"
    end run
    

    This simple AppleScript: grabs the file passed to it by step two; converts the file path to use POSIX slashes rather than HFS+ colons as delimiters; creates a terminal command for the HandBrake CLI using the .avi file as input, the “Normal” preset, and simply appending .mp4 to the existing file name on output; and passes the newly created file to the next step in the action.

  4. Move Finder Items moves the new .mp4 file to the “complete” folder, one level up from the “TV” folder.

  5. Show Growl Notification pops up a sticky Growl alert to let me know that a new episode has finished transcoding. Obviously, this step will only work if you have Growl installed.

Eventually, I’d like to figure out how to get the action to move the folder containing the just-processed .avi file to the trash, but I haven’t quite figured out how to do that without possibly also moving any other folders at the same level to the trash (which might interfere with other downloads not yet transcoded), so for now, I’m sticking with manually cleaning up the extra files after the transcoding is finished.

From there, all that really needs to be done is moving the file from the “completed” folder to its proper place in the Roksbox file structure, and it’s ready to watch on our TV. I do a few other steps manually to “pretty up” the experience — adding “poster art” and XML-based episode descriptions for the Roksbox interface — but those are entirely optional, and many people won’t see the need to bother with those steps.

And that’s it! 80% of the process is now completely automated, and that last 20% that I do manually is entirely optional and basically just feeds my anal-retentive need to present things as slickly as possible whenever I can.

Hopefully all this has been interesting and informative to at least a few people out there. Questions, comments, ideas for improvement? Let me know!

Lazyweb: Automated Crowdsourcing of Website Uptime/Downtime Tracking

Last night, Prairie and I were watching Bones on Netflix’s streaming service when Netflix suddenly stopped responding. In order to find out if there were service-wide problems, my first step was to turn to Twitter to see if there were any other people reporting problems — and as it turns out, there were. Reassured that it was a Netflix issue, and not something going wrong with my setup, we popped in a DVD until people on Twitter started reporting that things were working again.

It seems that using Twitter is becoming a more and more common way to get a quick handle on whether a particular website is having issues. This started me thinking about a website that could act as a simple, centralized tracker of uptime/downtime reports, gathered from real-time scanning of the Tweetstream. I don’t have the coding chops to do this, so I’m tossing the idea out to the Lazyweb in case anyone else wants to run with it.

The basic idea seems simple enough: scan the tweetstream for variations on the types of posts people make when a service is showing signs of problems. Basic search strings would be something along the lines of “* is [down|broken]” and “is * [down|broken]“. Anytime a hit is made on the search string, an entry is made in the database with the reported problem site and whatever might be considered relevant data from the source tweet (the tweet text, time/datestamp, perhaps even geolocation data for those tweets that are carrying it). Tracking reports of websites coming back online could be integrated as well, by watching strings such as “* is [back|up|back up|working]“.

The website would display a regularly updating display of downtime/uptime reports, one line per target website, with a series of stats indicating things like how recently the last problem or resolution tweet was recorded, the number of problem or resolution tweets found within the last 10, 30, or 60 minutes, perhaps a map showing geolocation markers that could indicate if downtime is widespread (indicating downtime at the website itself) or geographically targeted (indicating problems with a particular network, carrier, or ISP between the website and the Twitter users reporting problems), and whatever other data might be useful. It might be possible to use CSS to color-code lines depending upon variable such as the rate of problem tweets being found, too.

Anyway, that’s about as formed as the idea is in my head. If this sounds interesting to anyone else, feel free to grab the idea and run. If someone does build this based on this post, though, some mention or credit would be nice. ;)

I love my Roku

Readers Digest condensed Cliff’s Notes executive summary version: Do you have a Netflix account and a reasonable (1.5 MB/s or better) broadband connection? Then you should have a Roku player. That’s it.

So a couple months ago, I had a birthday, and with that birthday came some a little bit of spending money (courtesy of Prairie’s mom) that I wasn’t sure what to do with. As I’m in school, not making money, and existing solely on financial aid and Prairie’s good graces, I’ve gotten very used to spending money only on what’s necessary, and not on toys or frivolities. Because of this, I didn’t have much of a “wish list,” and the things I’m generally likely to spend money on — used books and vinyl — I currently have stacks of, waiting for me to find time to either read or import into the computer, so adding to the stacks (as enjoyable as that is) didn’t seem like the best way to go.

I let the money sit for a while as I played with various ideas, and eventually decided to go for something I’d been eyeballing for a while, but which had always fallen into the realm of “neat toy that could be fun, but isn’t really necessary right now”: a Roku digital video player.

Roughly two months in, I can easily say that this was one of the best impulse buys I’ve made in a long, long time.

First off, the basics, in case you haven’t heard of the Roku before. Originally developed at and for Netflix, and later spun off into its own company and opened to more content providers, the Roku is a tiny little set-top box that plugs into your TV, giving you access to the Netflix library of streaming “Watch Instantly” titles. Prairie and I had just recently started discovering the joys of Netflix’s streaming library (with the addition of my new iMac, as before that, none of our computers were new enough to support Netflix’s streaming service), but camping out in my office to watch shows on my computer wasn’t nearly as comfortable as our living room, so the Roku sounded like a nice addition to the house.

Setup is dead simple. The box is small, and if you have a WiFi network at home, requires the bare minimum of cables: power, and the connection to the television (if you don’t have WiFi, you’ll need to run an ethernet cable to the box). It has the three primary video connection methods (composite video, for old-school TVs like ours; component video, for higher-quality video on TVs that support progressive scan input; and HDMI for High Definition TVs) and both standard stereo and optical audio output.

Getting started took just a couple minutes: I plugged it in, told it which WiFi network to use and put in the password, and after a brief moment to let the box download and install new firmware and reboot, it was up and running. I popped into the Netflix channel, chose something in my Instant Watch queue, and was watching a show no more (and probably much less than) ten minutes after opening the box. Impressive!

The Netflix interface is slick and simple, and — thanks to a recent software update that actually came out just before I got the Roku — allows for searching and browsing the Netflix streaming library, and shows off all the recommendations of things that Netflix thinks we’ll enjoy watching.

There’s a lot more than just Netflix available, though. Roku’s channel store has an ever-growing library of options, with lots of internet-based shows and podcasts, sports channels, Pandora radio, and — our personal favorite after Netflix — Amazon Video on Demand. Last weekend after seeing Inception, Prairie and I were still in the movie mood, decided to see what new releases Amazon had available, and ended up renting, watching, and thoroughly enjoying Whip It!.

Our feelings at this point: Blockbuster is doomed. Outside of needing something rare enough that it’s not available to stream from Amazon or Netflix and soon enough that we can’t put in our physical Netflix queue, we have absolutely no reason to physically rent a video anymore. Movie theaters aren’t in much better shape, either — the entire experience of watching something at home is so much nicer, more comfortable, more convenient, and cheaper than going to the movies that we’ll be doing that far less than we already do (and we haven’t been going terribly often as it is).

The video quality of the Roku is great, as well. Admittedly, ours is helped somewhat by my television (geekery: though it’s an older, standard-ratio TV, this model Sony Wega offers an “anamorphic compression” mode that squeezes the picture down to a 16:9 ratio from the standard 4:3 ratio, increasing the resolution as it does so; this allows me to tell the Roku that it’s connected to a widescreen TV, at which point it outputs an anamorphic signal that results in a higher resolution and better quality image than if it were outputting the standard 4:3 640×480 TV signal), but the image quality easily matches (or at least comes very, very close to) what we see out of our DVD player. One of the very few disappointments I’ve had with the Roku (and a very minor one at that) is that while my TV can accept component video, the Roku apparently will only output component video as progressive scan output, which my TV doesn’t support, so I’ve had to resort to the lowest-quality composite video connection. Still, the quality we get is good enough that I can’t really complain — and when we finally get around to upgrading to an HDMI-capable HDTV, the quality will only get better!

There are a few relatively minor caveats to the Roku. Most importantly, you do need a reasonable (1.5 MB/s) broadband connection, and for HD video (not an issue for me at the moment), it requires at least a 5 MB/s connection (which, even if I had the hardware to display HD video, isn’t available from Qwest at my address yet). A WiFi network, while not necessary, as the box does have ethernet input, is highly recommended, as it keeps you from having to string more cabling around your house. And, of course, with any online-based service, there is the potential for network or server issues to occasionally get in the way, though we’ve had very few times where this was an issue (and when it was, Roku and Netflix were both good about communicating with their customers, and we even got a bit of a refund from Netflix to make up for the service interruption).

In short, we love this box. We’ve been using it nightly, bouncing among a number of shows that catch our eye (recently: Bones, Futurama, Law and Order, Red Dwarf, and 30 Rock), and saving movies for when we have the time and interest to invest in a movie. This has increased our usage of the streaming service to the point where we’re considering dropping our Netflix subscription from our current 3-at-a-time down to the basic 1-at-a-time service, as Netflix (so far, and I hope this continues) is kind enough to offer their streaming service without limitation at all subscription levels. Good deal!

Once again: if you have Netflix and broadband, you really should have a Roku.