As promised, here’s a bit more information on the geeky details of how I’ve set up our cable-free TV system.
First off, credit where credit is due: I got a lot of pointers in setting all of this up from this post at Nyquil.org, along with a couple of follow-up email messages with Jer. Thanks!
- Set up a GigaNews Usenet account. While Usenet, in the pre-web days, was one of the premier methods of communicating across the ‘net and thus included free with most Internet packages, those days are long gone. Now, Usenet is the best and fastest way to grab those TV episodes we’re looking for, but it costs a few dollars a month to get access (far less than your average cable bill, however). There are other Usenet providers available, but Giganews was recommended to me, is working fine for me, and is reasonably priced, so I’m passing on the recommendation to you.
-
Set up a (free) NZBs(dot)ORG account.
.nzbfiles are the Usenet equivalent of Bittorrent’s.torrentfiles: pointers to all the various pieces of each media file. NZBs(dot)ORG lists NZBs in a number of categories; the TV > XVID category is non-HD if you still have an old non-HDTV; people with HDTVs may want to use the x264 category for 720p/1080p content. -
Install SABnzbd+. This is a free, open-source program that handles all the pain-in-the butt steps of using
.nzbfiles. Without SABnzbd+…well, I’ll let Jer explain:…you…find yourself manually extracting RAR files, applying PAR2 files to regenerate missing chunks, and then disposing of all the compressed/encoded files after extracting your media file. Not to mention seeking out and downloading every episode of everything you want to download. It’s not for the faint of heart.
With SABnzbd+, you simply toss it the
.nzbfile, and it takes care of all of that for you. Even better, it supports a “drop folder” system, so you can simply put a downloaded.nzbfile into a folder, and moments later it automagically gets slurped into SABnzbd+ and the files start downloading. Even better than that, though, is its support for RSS feeds…and since NZBs(dot)ORG lets you save RSS feeds of particular searches, it’s relatively trivial to automate the downloading process.For my setup, I created an “nzb” folder inside my usual “Downloads” folder. Inside that, I have three folders: “new” (my SABnzbd+ drop folder, for adding manually downloaded
.nzbfiles), “incomplete” (where SABnzbd+ stores the in-progress downloads), and “complete” (where SABnzbd+ stores the finished downloads after post-processing). I also have an alias to the media folder that the Roksbox software accesses; this is for my own convenience and not necessary in all setups.
-
Set up and save searches on NZBs(dot)ORG for the shows you want to track. (NOTE: NZBs(dot)ORG has redesigned since this post was written, so these instructions aren’t quite correct anymore. They should be close enough to point you in the right direction, though.) Click on the “My Searches” link towards the top right of the NZBs(dot)ORG page, then click on “[Add]” next to “Saved Searches” towards the left of the “Add Search” page. Because NZBs(dot)ORG doesn’t allow for a preview of a search, I’ve found it easiest to keep the NZBs(dot)ORG front page open in a separate tab so that I can do a test search for my primary search terms, then look for which terms I want to exclude.
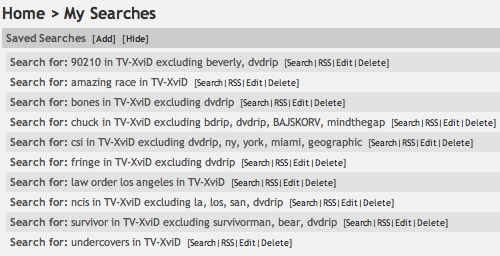
For example, we want to watch CSI, but aren’t interested in the New York or Miami spinoffs. So, my saved search uses the search term “csi” in the “TV-XviD” category, but filters out anything with “dvdrip” (as I’m not interested in older episodes ripped from DVDs), “ny,” “york,” “miami,” or “geographic” (apparently there’s a National Geographic show that uses the initials CSI in its title).

Eventually, you’ll build up a list of shows that will automatically populate whenever a new show that matches any of your saved searches appears on Usenet. Here’s a look at how my searches are set up — no snarks on our taste in TV, please, we’re quite aware of our guilty pleasures. ;)

Now, see that little “RSS” link after each search? Those are going to come in very handy, as we flip back over to SABnzbd+….
-
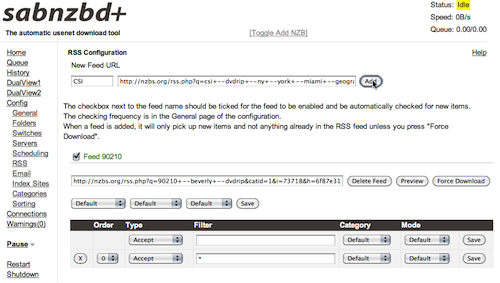
Add your saved searches to SABnzbd+. Under the “Config” link in the left hand sidebar of SABnzbd+, click on “RSS”. Copy the RSS feed link for one of your NZBs(dot)ORG saved searches, paste it into the “RSS Configuration” > “New Feed URL” field in SABnzbd+, name the feed something other than “Feed1”, and hit the “Add” button. That’s it!
(While SABnzbd+ does offer various filtering options for RSS feeds, because you’re taking care of the filtering ahead of time in your NZBs(dot)ORG searches, you shouldn’t need to worry about these fields. If you’re using a different
.nzbsearch site that doesn’t allow customization of RSS feeds, you should be able to use these filters to remove items you’re not interested in.)
The first time SABnzbd+ scans the RSS feed, it will not download anything — this is intentional, as you probably don’t want to suddenly be downloading all of the items listed in the RSS feed. If there are any recent episodes that you’d like to download, you can click on the “Preview” button next to your newly-entered feed to choose which items you’d like to download.
Go through and add the rest of the RSS feeds for your saved searches, and you’re all set. From here on out, as long as SABnzbd+ is running, it will keep an eye on your saved searches. Whenever a new episode that matches one of your searches appears, SABnzbd+ will see it in the RSS feed, grab the
.nzbfile, download everything it needs, assemble and decompress it, and store the finished download in the “completed” folder.
Now, if all you’re interested in is getting ahold of TV episodes and having them on your computer to watch, you’re set! I copy the downloaded files to a network drive and use the Plex software to pipe the shows over to the Roku player attached to our TV. Good to go!
NOTE: The following information is the original ending to this post, but is deprecated, as the situation is now simpler. However, I’m keeping it here for the sake of completeness.
However, in our case, I also need to convert the downloaded video from .avi to H.264-encoded .mov or .mp4 files, as that’s the only format that the Roku player will accept, and then move the files into their proper place within my computer’s webserver for Roksbox to access. While I haven’t been able to automate all of this, I have managed to use Automator, AppleScript, and the HandBrake video conversion software’s command line interface to automate the .avi to .mp4 conversion.
Now, I’m no Automator or AppleScript guru — this is actually one of my first experiments with either technology — so this may not be the best or most efficient way to handle this particular option. I’m certainly open to suggestions for improvement! However, it’s working for me…so far.
If you’d like, you can download my Automator action (121k .zip file). To install it, decompress the .zip file and add it to your ~LibraryWorkflowsApplicationsFolder Actions folder. Create a folder named “TV” inside the ~Downloadsnzbcomplete folder (it will be added automatically by SABnzb+ the first time it downloads a TV episode, but it needs to exist for this to work). Additionally, the HandBrake CLI must be installed in your main Applications directory.
To activate the HandBrake action, right-click on the “TV” folder and choose “Folder Actions Setup…” from the pop-up menu. In the Folder Actions Setup dialog, choose “Handbrake.workflow” and click the “Attach” button. Once that’s done, whenever SABnzbd+ finishes post-processing a download and moves the folder containing all of the files to the “TV” folder, this Automator workflow will automatically be triggered. Here’s what it does:
- Get Folder Contents and repeat for each subfolder found. This scans the TV folder and the folder that’s just been added to it to find all the contents.
-
Filter Finder Items for files with the
.aviextension that are larger than 20 MB (this avoids running into a conflict with the small quality sample.avifiles that are sometimes included). -
Run AppleScript
on run {input, parameters}
  set input to POSIX path of input
  set ConvertMovieCmd to "nice /Applications/HandBrakeCLI -i " & input & " -o " & input & ".mp4 --preset="Normal" ;"
  do shell script ConvertMovieCmd
  return input & ".mp4"
end run
This simple AppleScript: grabs the file passed to it by step two; converts the file path to use POSIX slashes rather than HFS+ colons as delimiters; creates a terminal command for the HandBrake CLI using the
.avifile as input, the “Normal” preset, and simply appending.mp4to the existing file name on output; and passes the newly created file to the next step in the action. -
Move Finder Items moves the new
.mp4file to the “complete” folder, one level up from the “TV” folder. -
Show Growl Notification pops up a sticky Growl alert to let me know that a new episode has finished transcoding. Obviously, this step will only work if you have Growl installed.
Eventually, I’d like to figure out how to get the action to move the folder containing the just-processed .avi file to the trash, but I haven’t quite figured out how to do that without possibly also moving any other folders at the same level to the trash (which might interfere with other downloads not yet transcoded), so for now, I’m sticking with manually cleaning up the extra files after the transcoding is finished.
From there, all that really needs to be done is moving the file from the “completed” folder to its proper place in the Roksbox file structure, and it’s ready to watch on our TV. I do a few other steps manually to “pretty up” the experience — adding “poster art” and XML-based episode descriptions for the Roksbox interface — but those are entirely optional, and many people won’t see the need to bother with those steps.
And that’s it! 80% of the process is now completely automated, and that last 20% that I do manually is entirely optional and basically just feeds my anal-retentive need to present things as slickly as possible whenever I can.
Hopefully all this has been interesting and informative to at least a few people out there. Questions, comments, ideas for improvement? Let me know!